

A properly functioning garage door is essential for the safety and convenience of your home. It acts as a main entry point and provides secure access to your space. However, like any frequently used home appliance, your garage door opener can encounter issues that disrupt its performance. Among the common problems faced by homeowners is a garage door that won’t respond as expected, which may require a simple reset to resolve.
This guide will detail the LiftMaster garage door opener reset procedures, which are crucial for maintaining your garage door’s smooth and secure operation. Whether you are troubleshooting a specific problem or conducting routine checks, knowing how to reset your LiftMaster garage door opener is an essential skill for any homeowner. In the following sections, we’ll provide detailed steps to help you confidently reset your device and ensure your garage door operates reliably.
When to Consider Resetting Your LiftMaster Garage Door Opener
Resetting your LiftMaster garage door opener can often resolve common issues that interrupt its operation. Understanding when a reset is necessary can save you time and ensure your garage door functions optimally. Here are several signs that may indicate the need to perform a “LiftMaster garage door opener reset”:
- Unresponsive Remote Controls: If your garage door opener does not respond to the remote control, even after replacing the batteries, a reset might be necessary to restore functionality.
- Door Reversing Unexpectedly: If the garage door reverses immediately after touching the ground or starts opening again without prompting, this can be a sign of a misalignment in the travel limits or safety sensors that a reset could fix.
- Erratic Operation: Should your garage door opener exhibit irregular behavior, such as opening and closing at random or only working intermittently, resetting could help rectify these electronic glitches.
The Importance of Troubleshooting Before Opting for a Reset
Before you proceed with a reset, it’s crucial to perform some basic troubleshooting. This step ensures that a reset is indeed necessary and prevents the unnecessary clearing of programmed settings. Check for obvious issues like obstructions in the door’s path, ensure the safety sensors are aligned and free of debris, and verify that all remote controls are functioning properly. If these elements are in order, and your opener is still malfunctioning, then proceeding with the “LiftMaster garage door opener reset” might be the next best step. This approach not only solves immediate issues but also aids in maintaining the longevity and effectiveness of your garage door opener.
Tools and Preparations for a Successful LiftMaster Garage Door Opener Reset
Resetting your LiftMaster garage door opener is a straightforward process that requires some basic tools and safety measures. Here’s how you can prepare effectively to ensure a smooth and safe reset procedure.
Necessary Tools
To reset your LiftMaster garage door opener, you’ll need the following tools:
- Screwdriver: This is used to access the reset button on some models if it’s not directly exposed.
- Ladder: A stable ladder is essential to reach the garage door opener safely.
- Flashlight: Helpful if your garage unit lacks sufficient lighting.
Safety Precautions
Safety should always be your top priority when working on any home maintenance task, especially when it involves electrical devices:
- Turn Off Power: Ensure that the power to the garage door opener is turned off at the circuit breaker to prevent any accidental activation or electrical shock.
- Steady Ladder Use: Make sure your ladder is stable and securely placed. Avoid standing on the top rung for extra safety.
- Avoid Loose Clothing or Jewelry: These items can get caught in the mechanical parts of the garage door system, posing serious risks.
Consulting the LiftMaster Manual
Each LiftMaster garage door opener model may have slightly different reset procedures. It’s crucial to consult the manual specific to your model. Here are some tips for utilizing the manual effectively:
- Model Number: Locate the model number on your unit before consulting the manual. This ensures that the guidance you follow is accurate for your specific device.
- Online Resources: If you’ve misplaced the physical manual, LiftMaster’s official website offers downloadable manuals. Input your model number to find the correct document.
- Customer Support: For any uncertainties or additional questions, LiftMaster’s customer support can provide direct assistance and advice tailored to your model.
Following these guidelines not only prepares you for a successful “LiftMaster garage door opener reset” but also ensures that the process is handled safely and effectively. Always double-check your preparations and consult the specific manual for the best results.
Step-by-Step Guide to Resetting Your LiftMaster Garage Door Opener
Resetting your LiftMaster garage door opener is a necessary task when you encounter operational glitches or need to erase all previous settings. This guide provides a clear, detailed walkthrough on how to perform a “LiftMaster garage door opener reset,” including how to locate the Learn button, clear existing codes, re-program your remotes, and confirm a successful reset. High-quality images or diagrams are included to enhance understanding and ensure you can follow along easily.
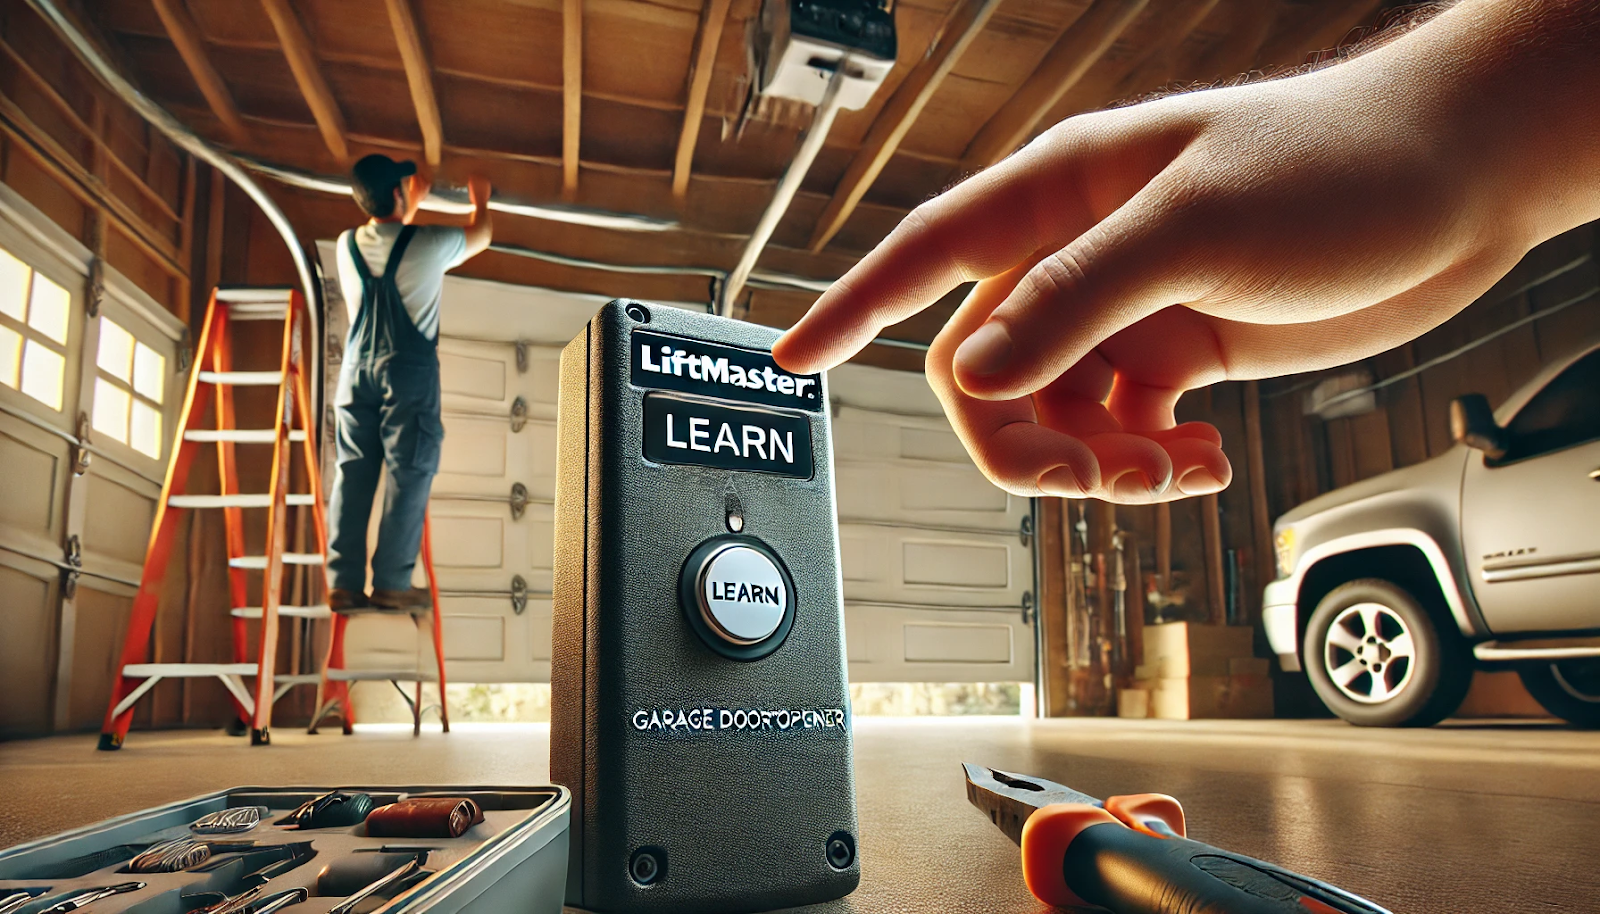
Step 1: Locating the Learn Button
The Learn button is crucial for resetting your garage door opener and reprogramming the remotes.
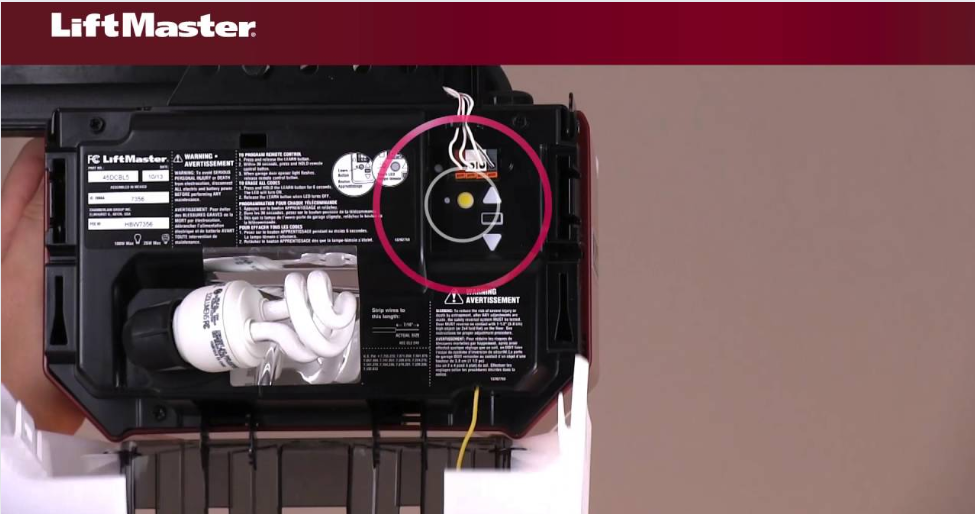
- Location: Typically, the Learn button is located on the back or side of the garage door opener unit, accessible by removing the light cover or panel.
- Identification: The button is usually colored red, yellow, green, or purple, and clearly labeled as “Learn.”
Step 2: Clearing Existing Codes
To ensure your garage door operates securely, it’s essential to clear all existing programming.
- Procedure: Press and hold the Learn button for about 6 seconds until the LED light next to it goes out. This action clears all remote control and keypad codes from the opener’s memory.
Step 3: Re-programming Remotes
After clearing the old codes, you must re-program your remotes to regain control of your garage door.
- Reprogramming: Press and release the Learn button. Then, within 30 seconds, press and hold the button on your remote control until the garage door opener light blinks or you hear two clicks, indicating successful programming.
Step 4: Confirming Successful Reset
To confirm that your reset was successful, test the newly programmed remotes.
- Testing: Use your remote to open and close the door several times to ensure it responds correctly.
Visual Aids
For better clarity, this guide includes diagrams and images showing:
- The typical location of the Learn button.
- Step-by-step visuals on clearing codes and programming remotes.
Resetting your LiftMaster garage door opener can resolve many common issues and refresh your system’s settings, enhancing security and functionality. By following these steps carefully, you can ensure a successful reset and maintain the optimal operation of your garage door repair and opener system.
Troubleshooting Common Issues After a LiftMaster Garage Door Opener Reset
Resetting your LiftMaster garage door opener is typically a straightforward process that resolves many operational issues. However, sometimes unexpected problems may arise post-reset. This guide addresses common issues such as a non-functional remote or a door that doesn’t close properly after performing a “LiftMaster garage door opener reset.” Below, you’ll find practical troubleshooting steps for each of these common concerns.
Issue 1: Remote Still Not Working
If your remote control fails to operate the garage door even after a reset, try these steps:
- Check Battery: Replace the battery in the remote to rule out power issues.
- Re-Program the Remote: It’s possible the remote was not correctly programmed during the reset process. Refer back to the reprogramming instructions in the reset guide and attempt to program the remote again.
- Interference: Occasionally, frequency interference from other devices can cause issues. Ensure there are no new electronic devices nearby that could be interfering with the signal.
Issue 2: Door Not Closing Properly
A door that does not close properly post-reset can be a major inconvenience and security risk.
- Check Alignment of Safety Sensors: Misaligned sensors are a common cause for a garage door not closing properly. Ensure the sensors on either side of the door are aligned and that there’s nothing obstructing their path.
- Adjust Force Settings: If the door closes partially and then reverses, you may need to adjust the force settings on the opener. This controls the amount of force used to open and close the door.
- Limit Settings: Similar to force settings, incorrect limit settings can prevent the door from closing fully. Refer to your LiftMaster manual to adjust the limit settings correctly.
General Tips
- Consult the Manual: For both issues, consulting your specific model’s manual can provide model-specific troubleshooting steps and settings.
- Watch for Error Codes: Some models have LED lights that flash to indicate specific errors. Refer to your manual to decode these flashes.
- Test Regularly: After making adjustments, test the door several times to ensure the issue is resolved.
Following these troubleshooting steps, you can resolve common issues that might occur after a “LiftMaster garage door opener reset.” If problems persist, contacting a professional technician is recommended to ensure your garage door opener remains in optimal working condition.
Frequently Asked Questions
How do I reset my LiftMaster garage door opener?
To reset your LiftMaster garage door opener:
- Locate the Learn button on your unit. This button is usually on the back or side of the opener, under the light cover.
- Press and hold the Learn button for about 6 seconds until the indicator light goes out. This action clears all programmed data.
- Re-program your remotes by pressing the Learn button briefly, then pressing the button on your remote until the light flashes or you hear two clicks, indicating successful programming.
How do I resync my LiftMaster garage door opener?
To resync your LiftMaster garage door opener:
- Press the Learn button on the garage door opener unit.
- Within 30 seconds, press and hold the button on the remote control.
- Release the button once the garage door opener light blinks or you hear two clicks, signaling that the remote is now synced.
Do garage door openers have a reset button?
Yes, most garage door openers, including those from LiftMaster, have a reset button known as the Learn button. This button is used to clear all previous settings and reprogram the remotes and keypads connected to the opener.
Why is my LiftMaster garage remote door opener not working?
There could be several reasons why your LiftMaster garage door remote is not working:
- The battery in the remote may be dead.
- The remote may need to be resynced with the garage door opener.
- The garage door opener itself may have an issue, such as interference from other devices or a need for a reset.
What causes a LiftMaster garage door opener not to work?
Several factors can cause your LiftMaster garage door opener to malfunction:
- Power issues, such as disruptions in electrical supply or a tripped circuit breaker.
- Misalignment or obstruction of the safety sensors.
- Worn out or broken components within the opener mechanism.
- A need for resetting or reprogramming due to memory errors or after a power outage.
Conclusion
Successfully resetting your LiftMaster garage door opener can significantly enhance the functionality and security of your garage door. We’ve walked through the essential steps from locating the Learn button and clearing existing codes to re-programming your remotes and troubleshooting common post-reset issues. These guidelines are designed to empower you with the knowledge to handle minor troubleshooting confidently.
While many issues can be resolved through a simple “LiftMaster garage door opener reset,” some problems might be more complex and require professional intervention. If you encounter persistent issues or the troubleshooting steps do not resolve your concerns, it’s advisable to contact a professional.
Consider Ace Garage Door & Gate Co for expert advice and top-tier service. As a trusted source for all your garage door and gate needs, we offer professional assistance that ensures your new garage door system operates safely and efficiently. Whether you need a routine check-up or more detailed repairs, their experienced technicians are ready to provide you with the best solutions.
Remember, regular maintenance and timely resets can keep your LiftMaster garage door opener in optimal condition, but when in doubt, professional help is just a call away.
End Note
Ace Garage Door & Gate Co is dedicated to providing top-notch garage door and gate services that exceed customer expectations. We are known for our reliability and quality, making us the trusted choice for all your garage door and gate needs. On our About Us page, you’ll learn about our commitment to excellence.
Our Service page highlights the wide range of services we offer to keep your doors and gates working perfectly. Our specialized Gate Services section focuses on enhancing and securing your property with care. Our Service Areas page shows that we’re always nearby and ready to help.
You can see examples of our work in the Gallery and read customer feedback on the Review page. Stay informed and inspired with our Blog, and never hesitate to reach out through our Contact Us page—we’re always here to serve you better. Ace Garage Door & Gate Co is where quality meets reliability every time.


